---
title: "Add fields to objects in the classic view"
slug: "add-fields-to-objects-in-the-classic-view"
description: "Customize your CPQ workspace by adding custom fields to objects in the classic view. Adding custom fields helps you track information important for your company, making your workflow more efficient. "
updated: 2026-07-22T14:05:59Z
published: 2026-07-31T10:00:05Z
canonical: "docs.zilliant.com/add-fields-to-objects-in-the-classic-view"
---
> ## Documentation Index
> Fetch the complete documentation index at: https://docs.zilliant.com/llms.txt
> Use this file to discover all available pages before exploring further.
# Add fields to objects in the classic view
> [!NOTE]
> Tip
>
> This topic describes adding fields to objects in the classic view. If you use the new UI, read [Adding fields to objects in the new UI](/v1/docs/add-fields-to-objects).
You can customize your workspace by creating a tab on the quote, product, and account objects in CPQ and adding custom fields to it. These custom fields help you track information important to your company, making your workflow more efficient.
Custom fields can store user-entered values (business data attributes) or reference existing objects (business relational attributes).
## Prerequisites
- To work with the schema extension file, you must have the administrator role.
- To restart CPQ, you need access to the AWS portal.
## Add fields to objects
1. [Download the schema extension file](/v1/docs/add-fields-to-objects-in-the-classic-view#download-the-schema-extension-file).
2. In the downloaded file, [add a script snippet to define a tab with custom fields](/v1/docs/add-fields-to-objects-in-the-classic-view#write-the-script).
3. [Upload the edited file into CPQ](/v1/docs/add-fields-to-objects-in-the-classic-view#upload-the-schema-extension-file-into-cpq).
4. [Set CPQ to maintenance mode](/v1/docs/add-fields-to-objects-in-the-classic-view#set-cpq-to-maintenance-mode).
5. [Restart CPQ](/v1/docs/add-fields-to-objects-in-the-classic-view#restart-cpq).
6. [Load customizations in CPQ](/v1/docs/add-fields-to-objects-in-the-classic-view#load-customizations-in-cpq).
7. Sign out and then sign in to CPQ. Customizations are now visible in the application. If you don’t see customizations, try clearing your browser cache.
8. If you defined a business relational attribute field in the schema extension file, [add the field values in CPQ](/v1/docs/add-fields-to-objects-in-the-classic-view#add-values-of-a-business-relational-attribute-field).
9. If you defined a field linked to a Groovy script in the schema extension file, [upload the Groovy script file into CPQ](/v1/docs/add-fields-to-objects-in-the-classic-view#upload-a-groovy-script).
---
### Download the schema extension file
1. From the application left navigation area:
- In the classic view, select **Administration**.
- In the new UI, select **Settings** > **Administration**.
2. From the top navigation bar, select **Content Management**.
3. Select **conf** > **ontology**.
4. Select the **application-schema-ext.owl** file to download it.
---
### Write the script
In the script:
- [Define a tab](/v1/docs/add-fields-to-objects-in-the-classic-view#define-a-tab)
- (Optional.) [Define a subtab](/v1/docs/add-fields-to-objects-in-the-classic-view#define-a-subtab)
- [Define fields on the tab](/v1/docs/add-fields-to-objects-in-the-classic-view#define-a-field)
- [Define a business data attribute field](/v1/docs/add-fields-to-objects-in-the-classic-view#define-a-business-data-attribute-field)
- [Define a business relational attribute field](/v1/docs/add-fields-to-objects-in-the-classic-view#define-a-business-relational-attribute-field)
- [Define a field linked to a Groovy script](/v1/docs/add-fields-to-objects-in-the-classic-view#define-a-field-linked-to-a-groovy-script)
> [!NOTE]
> Tip
>
> The **application-schema-ext.owl** file uses variables defined at the beginning of the file, for example, `as`, `ase`, `rdf`, `rdfs`, `ps`, and others.
### Define a tab
A tab is a container for custom fields. To add a new tab to an object, use the following script structure:
```xml
Display name of the tab
Tab's order number in the object
Tab ID
Tab description
Tab object name
```
#### Element descriptions
| Element | Description |
| --- | --- |
| `<owl:NamedIndividual rdf:about="Tab URI">` | URI of the tab. Replace `Tab URI` with your URI. |
| `<rdf:type rdf:resource="Object type"/>` | Object type. Replace `Object type` with `&as;Group`. |
| `<rdfs:label xml:lang="language">` | Display name of the tab. You can define a display name for multiple languages. |
| `xml:lang="language"` | ISO 639 of the language, for example, `en` or `de`. Replace `language` with a needed code. |
| `<ps:sequenceID rdf:datatype="&xsd;int">` | Tab's order number. |
| `<ps:groupCode rdf:datatype="&xsd;int">` | Tab ID. |
| `<ps:groupDescription rdf:datatype="&xsd;string">` | Text description of the tab’s purpose or function. |
| `<ps:objectName rdf:datatype="&xsd;string">` | Internal name of the tab object, used for referencing within the schema. |
### Define a subtab
Use a subtab for easier navigation within your custom tab. It’s an optional element.
To add a subtab to an object, use the following script structure:
```xml
Display name of the subtab
Subtab's order number on the tab
Subtab ID
Subtab description
Subtab object name
```
#### Element descriptions
| Element | Description |
| --- | --- |
| `<owl:NamedIndividual rdf:about="Subtab URI">` | URI of the subtab. Replace `Subtab URI` with your URI. |
| `<rdf:type rdf:resource="Object type"/>` | Object type. Replace `Object type` with `&as;SubGroup`. |
| `<rdfs:label xml:lang="language">` | Display name of the subtab. You can define a display name for multiple languages. |
| `xml:lang="language"` | ISO 639 of the language, for example, en or de. Replace language with a needed code. |
| `<ps:sequenceID rdf:datatype="&xsd;int">` | Subtab’s order number. |
| `<ps:groupCode rdf:datatype="&xsd;int">` | Subtab ID. |
| `<ps:groupDescription rdf:datatype="&xsd;string">` | Text description of the subtab’s purpose or function. |
| `<ps:objectName rdf:datatype="&xsd;string">` | Internal name of the subtab object, used for referencing within the schema. |
### Define a field
To add a field, use the following script structure:
```xml
Display name of the field
Field's order number on the tab
Boolean value
Boolean value
Boolean value
```
#### Element descriptions
| Element | Description |
| --- | --- |
| `<owl:DatatypeProperty rdf:about="Field URI">` | URI of the field. Replace `Field URI` with your URI. |
| `<rdf:type rdf:resource="Object type"/>` | Object type. Replace `Object type` with the needed object type. For details, read a section for the field type you’re adding: - [Define a business data attribute field](/v1/docs/add-fields-to-objects-in-the-classic-view#define-a-business-data-attribute-field) - [Define a business relational attribute field](/v1/docs/add-fields-to-objects-in-the-classic-view#define-a-business-relational-attribute-field) - [Define a field linked to a Groovy script](/v1/docs/add-fields-to-objects-in-the-classic-view#define-a-field-linked-to-a-groovy-script) |
| `<rdfs:label xml:lang="language">` | Display name of the field. You can define a display name for multiple languages. |
| `xml:lang="language"` | ISO 639 of the language, for example, `en` or `de`. Replace `language` with a needed code. |
| `<ps:sequenceID rdf:datatype="&xsd;int">` | Field's order number. |
| `<ps:group rdf:resource="Tab URI"/>` | URI of the tab to which you want to add the field. Replace `Tab URI` with the needed URI. |
| `<ps:subGroup rdf:resource="Subtab URI"/>` | URI of the subtab to which you want to add the field. Replace `Subtab URI` with the needed URI. |
| `<as:synchronizeAllowed rdf:datatype="&xsd;boolean">` | Indicates whether to synchronize the field value with the database immediately. Supported values: - `true`—Once users click outside the field, the system automatically synchronizes the field value with the database. - `false`—System synchronizes the field value with the database only when users select the **Save** button or go to a different tab. |
| `<ps:enumerable rdf:datatype="&xsd;boolean">` | Indicates whether the field is enumerable. If a field is enumerable, users can select its value from the dropdown list. Supported values are `true` and `false`. |
| `<ps:mandatory rdf:datatype="&xsd;boolean">` | Indicates whether the field is mandatory. If a field is mandatory, users can’t leave it empty. Supported values are `true` and `false`. |
| `<rdfs:domain rdf:resource="Object to which you add the field"/>` | Name of the object to which you add the field, such as Quote or Account. Replace `Object to which you add the field` with the object name. Supported values: - `&as;Quote` - `&as;Product` - `&as;Account` |
| `<rdfs:subPropertyOf rdf:resource="Field type"/>` | Type of the field. For details, read a section for the field type you’re adding: - [Define a business data attribute field](/v1/docs/add-fields-to-objects-in-the-classic-view#define-a-business-data-attribute-field) - [Define a business relational attribute field](/v1/docs/add-fields-to-objects-in-the-classic-view#define-a-business-relational-attribute-field) - [Define a field linked to a Groovy script](/v1/docs/add-fields-to-objects-in-the-classic-view#define-a-field-linked-to-a-groovy-script) |
| `<rdfs:range rdf:resource="Field data type"/>` | Type of the field data. For details, read a section for the field type you’re adding: - [Define a business data attribute field](/v1/docs/add-fields-to-objects-in-the-classic-view#define-a-business-data-attribute-field) - [Define a business relational attribute field](/v1/docs/add-fields-to-objects-in-the-classic-view#define-a-business-relational-attribute-field) - [Define a field linked to a Groovy script](/v1/docs/add-fields-to-objects-in-the-classic-view#define-a-field-linked-to-a-groovy-script) |
### Define a business data attribute field
To add a custom field for user-entered data, use the script structure from the [Define a field](/v1/docs/add-fields-to-objects-in-the-classic-view#define-a-field) section with the following values:
| Element | Value |
| --- | --- |
| `<rdf:type rdf:resource="Object type"/>` | Replace `Object type` with `&owl;FunctionalProperty`. |
| `<rdfs:subPropertyOf rdf:resource="Field type"/>` | Replace `Field type` with one of the following values: - `&as;assertion`—Users manually enter the field value. - `&as;calculation`—System automatically calculates the field value and users can’t edit it. If you select this field type, you must also add the following elements: - `<rdfs:subPropertyOf rdf:resource="&as;materialization"/>` - SPARQL expression based on which the system calculates the value. **Sample script snippet with a SPARQL expression** ```xml ``` |
| `<rdfs:range rdf:resource="Field data type"/>` | Replace `Field data type` with one of the following values: - `&xsd;string` - `&xsd;decimal` - `&xsd;dateTime` - `&xsd;boolean` - `&xsd;int` |
### Define a business relational attribute field
To add a custom field that should reference a custom object and its values:
1. Use the script structure from the [Define a field](/v1/docs/add-fields-to-objects-in-the-classic-view#define-a-field) section with the following values:
| Element | Value |
| --- | --- |
| `<rdf:type rdf:resource="Object type"/>` | Replace `Object type` with `&owl;FunctionalProperty`. |
| `<rdfs:subPropertyOf rdf:resource="Field type"/>` | Replace `Field type` with `&as;has`. This value indicates that the field is linked to a custom object. |
| `<rdfs:range rdf:resource="Field data type"/>` | Replace `Field data type` with the system name of the custom object. For details on defining the custom object, go to the next step. |
2. Define the custom object. Add a script snippet with the following structure:
```xml
```
In this script snippet:
| Element | Description |
| --- | --- |
| `<owl:Class rdf:about="System name of the object">` | System name of the object. Replace `System name of the object` with an object name. |
| `<rdfs:subClassOf rdf:resource="&as;Attribution"/>` | Use this element without changes. |
| `<rdfs:subClassOf rdf:resource="&as;Cashed"/>` | Use this element without changes. |
> [!WARNING]
> Note
>
> To define object values, perform Step 8 in [Add fields to objects](/v1/docs/add-fields-to-objects-in-the-classic-view#add-fields-to-objects). Object values display as dropdown list options when users select the field.
### Define a field linked to a Groovy script
You can link your field to a Groovy script, so it runs whenever users modify the field value. To add such a field:
1. Use the script structure from the [Define a field](/v1/docs/add-fields-to-objects-in-the-classic-view#define-a-field) section with the following values:
| Element | Value |
| --- | --- |
| `<rdf:type rdf:resource="Object type"/>` | Replace `Object type` with `&owl;FunctionalProperty`. |
| `<rdfs:subPropertyOf rdf:resource="Field type"/>` | Replace `Field type` with one of the following values: - `&as;assertion`—Users manually enter the field value. - `&as;calculation`—System automatically calculates the field value and users can’t edit it. If you select this field type, you must also add the following elements: - `<rdfs:subPropertyOf rdf:resource="&as;materialization"/>` - SPARQL expression based on which the system calculates the value. **Sample script snippet with a SPARQL expression** ```xml ``` |
| `<rdfs:range rdf:resource="Field data type"/>` | Replace `Field data type` with one of the following values: - `&xsd;string` - `&xsd;decimal` - `&xsd;dateTime` - `&xsd;boolean` - `&xsd;int` |
2. Add to the script the following field:
| Element | Description |
| --- | --- |
| `<ps:useScriptOnUpdate rdf:resource="URI of the Groovy script"/>` | Indicates that the system must run a Groovy script when users update the field value. Replace `URI of the Groovy script` with the URI of the Groovy script you want to run. For details on defining the Groovy script, go to the next step. |
3. Define the Groovy script. Add a script snippet with the following structure:
```xml
Display name of the Groovy script
```
In this script snippet:
| Element | Description |
| --- | --- |
| `<owl:NamedIndividual rdf:about="URI of the Groovy script">` | URI of the Groovy script. Replace `URI of the Groovy script` with your URI. |
| `<rdf:type rdf:resource="&ps;GroovyScript"/>` | Use this element without changes. |
| `<ps:objectName rdf:datatype="&xsd;string">` | Display name of the Groovy script. |
| `<ps:hasGroovyScriptType rdf:resource="&ps;SystemGroovyScript"/>` | Use this element without changes. |
> [!WARNING]
> Note
>
> To upload the Groovy script file to run when users update the field value, perform Step 9 in [Add fields to objects](/v1/docs/add-fields-to-objects-in-the-classic-view#add-fields-to-objects).
---
### Upload the schema extension file into CPQ
> [!NOTE]
> Tip
>
> Before uploading the updated file, save a copy of the original. This way, you can restore the application to its previous version if a critical error occurs. For details, read [Troubleshoot](/v1/docs/add-fields-to-objects-in-the-classic-view#troubleshoot).
1. From the application left navigation area:
- In the classic view, select **Administration**.
- In the new UI, select **Settings** > **Administration**.
2. From the top navigation bar, select **Content Management**.
3. Select **conf** > **ontology**.
4. Above the list of files, select .
5. Select the file to upload.
6. Select **Yes** to overwrite the existing file.
---
### Set CPQ to maintenance mode
When you turn on the maintenance mode, CPQ notifies all signed-in users that it restarts in 10 minutes and they need to save all changes. The system doesn’t allow new sign-ins during this time.
To set CPQ to maintenance mode:
1. From the application left navigation area:
- In the classic view, select **Administration**.
- In the new UI, select **Settings** > **Administration**.
2. From the top navigation bar, select **Operation Settings**.
3. In the **General** section, set the **Maintenance Mode** switch to **YES**.
---
### Restart CPQ
> [!WARNING]
> Note
>
> When you restart the application, all active users are automatically signed out and all unsaved changes are lost.
1. Sign in to the AWS access portal with your administrator credentials.
2. On the top navigation bar, ensure that the correct region is selected.
3. Select your system.
4. Select **Elastic Beanstalk**, then select your environment.
5. Select **Actions** > **Restart app server(s)**. Select **Restart** to confirm.
---
### Load customizations in CPQ
1. From the application left navigation area:
- In the classic view, select **Administration**.
- In the new UI, select **Settings** > **Administration**.
2. From the top navigation bar, select **Operation Settings**, then select the **System Settings** subtab.
3. In the **General** section, under **Load Customizing**, select **Start**.
---
### Add values of a business relational attribute field
If you defined a [business relational attribute field](/v1/docs/add-fields-to-objects-in-the-classic-view#define-a-business-relational-attribute-field) in the schema extension file, add the field values in CPQ:
1. From the application left navigation area:
- In the classic view, select **Administration**.
- In the new UI, select **Settings** > **Administration**.
2. From the top navigation bar, select **Master Data Management**.
3. Scroll or search to locate the custom object you defined in the schema extension file and select it from the list.
4. Select , then select the newly added row.
5. On the **Configuration** tab, enter information to define an object value:
- **Name**—Enter an object value.
- **External Id**—(Optional.) External ID of the value.
- **ERP Id**—(Optional.) ERP ID of the value.
6. Select **Save**.
7. (Optional.) On the **Localisation** tab, in the **Label** field next to the needed languages, enter a translation of the value name. Then select  to save the changes.
8. To add another object value, repeat Steps a–g.
---
### Upload a Groovy script
If you defined a [field linked to a Groovy script](/v1/docs/add-fields-to-objects-in-the-classic-view#define-a-field-linked-to-a-groovy-script) in the schema extension file, upload the Groovy script file into CPQ:
1. From the application left navigation area:
- In the classic view, select **Administration**.
- In the new UI, select **Settings** > **Administration**.
2. From the top navigation bar, select **Master Data Management**.
3. Scroll or search to locate **Groovy Script** and select it from the list.
4. Select the Groovy script you defined in the schema extension file.
5. Under **Script File**, select the folder icon to open the file selection window. Select the Groovy script file to upload, then select **Upload**.
6. Select **Save**.
---
## Example
The following image shows the custom **Training Group** tab in a quote.
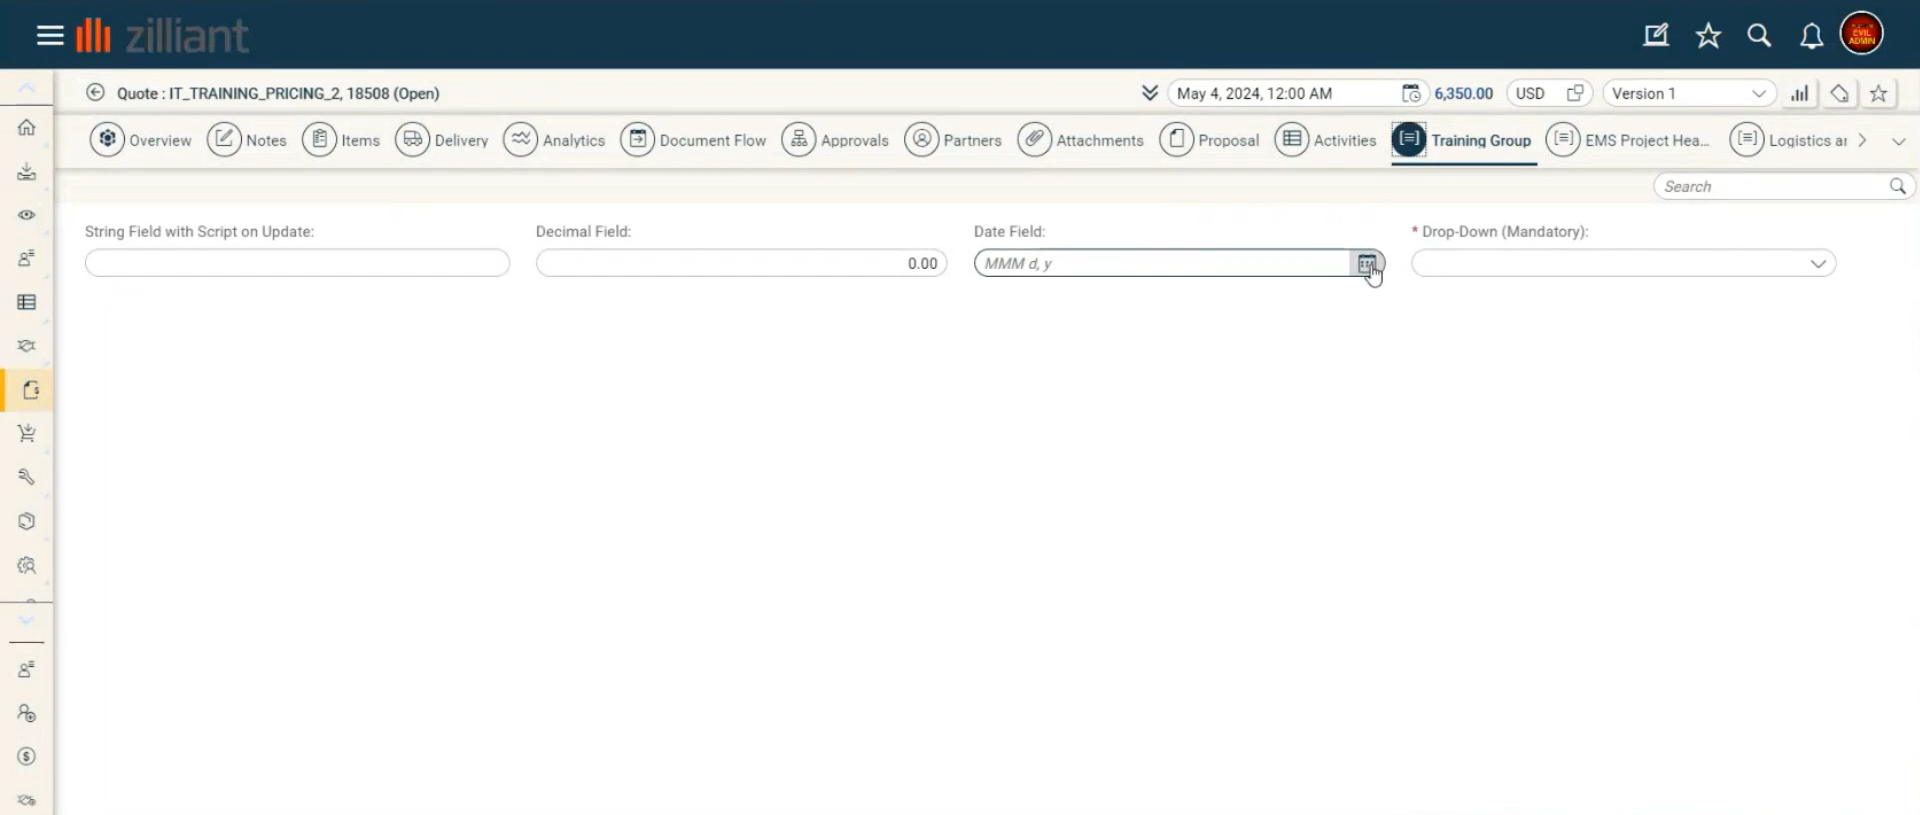
The tab includes the following custom fields:
- **String Field with Script on Update**—Field of the business data attribute type. Any updates to this field trigger a Groovy script execution. This is an optional field with a string data type.
- **Decimal Field**—Field of the business data attribute type. This is an optional field with a decimal data type.
- **Date Field**—Field of the business data attribute type. This is an optional field with a dateTime data type.
- **Drop-Down (Mandatory)**—Field of the business relational attribute type. It is linked to a custom object and displays predefined values in the dropdown list. This field is mandatory.
To define this tab with custom fields, add the following script snippet to the schema extension file.
**Script snippet**
```xml
Training Group
Trainingsgruppe
1
10
Training Group
TrainingGroup
String Field with Script on Update
10
true
Custom Groovy Script on Field Update
Decimal Field
20
false
Date Field
30
false
Drop-Down (Mandatory)
40
false
true
true
```
---
## Troubleshoot
If a critical error occurs after you upload the updated schema extension file, and you can’t sign in to CPQ, you must recover the application.
> [!WARNING]
> Note
>
> To recover the application, you need admin authorization for the S3 bucket in AWS. Due to potential risks, this access is granted only in specific cases. If CPQ restart fails, contact your Zilliant representative for assistance.
To recover the application:
1. Upload the backup file to the AWS access portal.
1. Sign in to the AWS access portal with your administrator credentials.
2. Select your system.
3. Select **S3**, then select your system.
4. Select **root/** > **conf/** > **ontology/**.
5. Select **Upload**.
6. In the **Files and folders** section, select **Add files**.
7. Select your backup schema extension file, then select **Upload**.
2. Restart CPQ.
1. In the AWS access portal, select your system.
2. Select **Elastic Beanstalk**, then select your environment.
3. On the top navigation bar, next to your user name, verify that the correct location is active.
4. Select **Actions** > **Restart app server(s)**. Then select **Restart** to confirm. Restart may take 20–30 minutes.